A Raspberry Pi Pico Controller
Features
Ample memory resources.
High performance
Inexpensive
Usage
Quick start
This section assumes that the ECApp firmware has been successfully loaded onto the Pico board. (See Building the firmware for details on building and loading the firmware.)
Connect to the Pico board. On Linux, dmesg should display
something like the following to indicate that a new serial device
(/dev/ttyACM0 in this case) is available for use:
[179579.216951] usb 2-2.1: new full-speed USB device number 10 using uhci\_hcd
[179579.331685] usb 2-2.1: New USB device found, idVendor=2e8a, idProduct=000a
[179579.331688] usb 2-2.1: New USB device strings: Mfr=1, Product=2, SerialNumber=3
[179579.331689] usb 2-2.1: Product: Pico
[179579.331690] usb 2-2.1: Manufacturer: Raspberry Pi
[179579.331691] usb 2-2.1: SerialNumber: E660583883389832
[179579.370931] cdc\_acm 2-2.1:1.0: ttyACM0: USB ACM device
On MacOS running ioreg should show the following:
$ ioreg -p IOUSB
+-o Root  <class IORegistryEntry, id 0x100000100, retain 15>
  +-o AppleUSBXHCI Root Hub Simulation@14000000  <class AppleUSBRootHubDevice, id 0x10000035b, registered, matched, active, busy 0 $
    +-o Bluetooth USB Host Controller@14300000  <class AppleUSBDevice, id 0x10000109f, registered, matched, active, busy 0 (1 ms), $
    +-o Pico@14200000  <class AppleUSBDevice, id 0x10000166c, registered, matched, active, busy 0 (4 ms), retain 15>
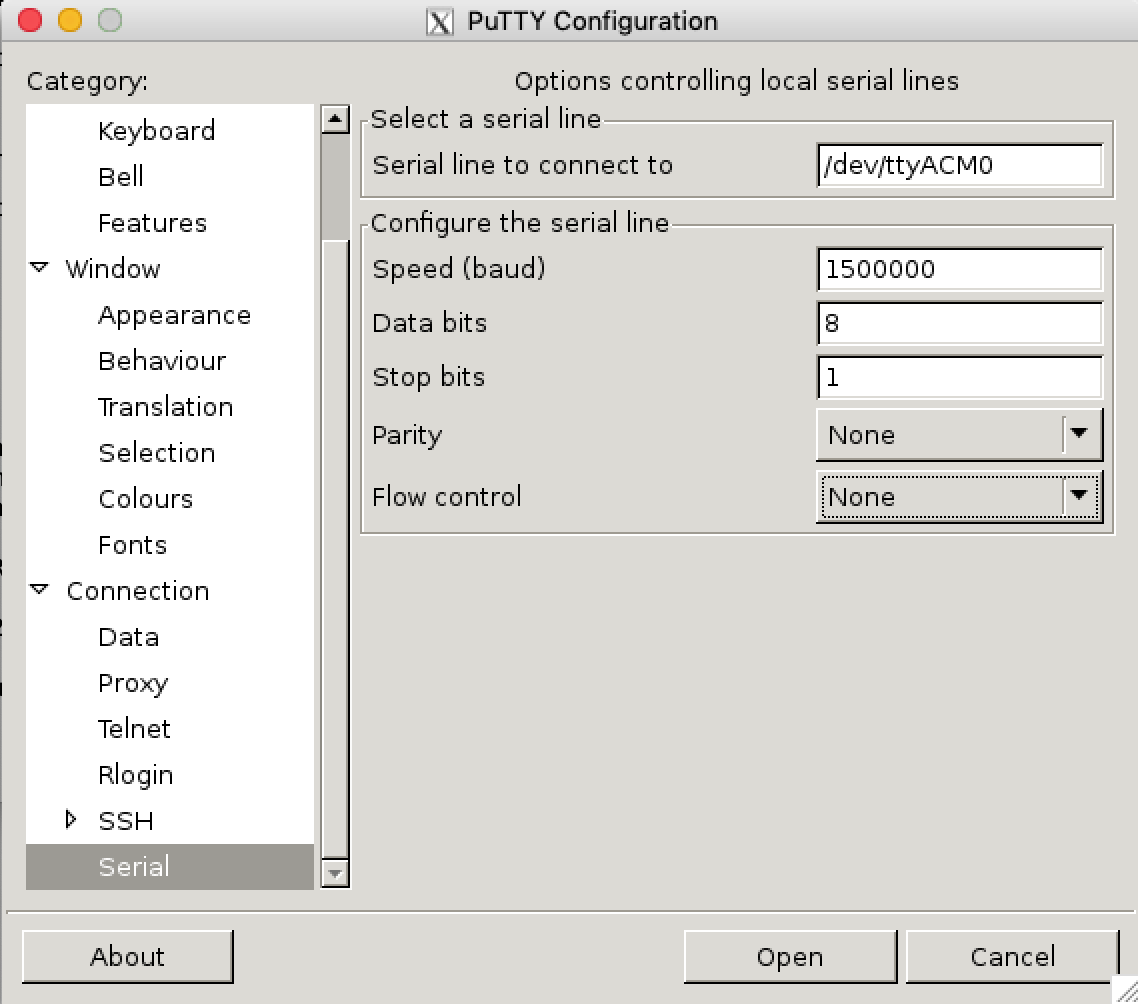
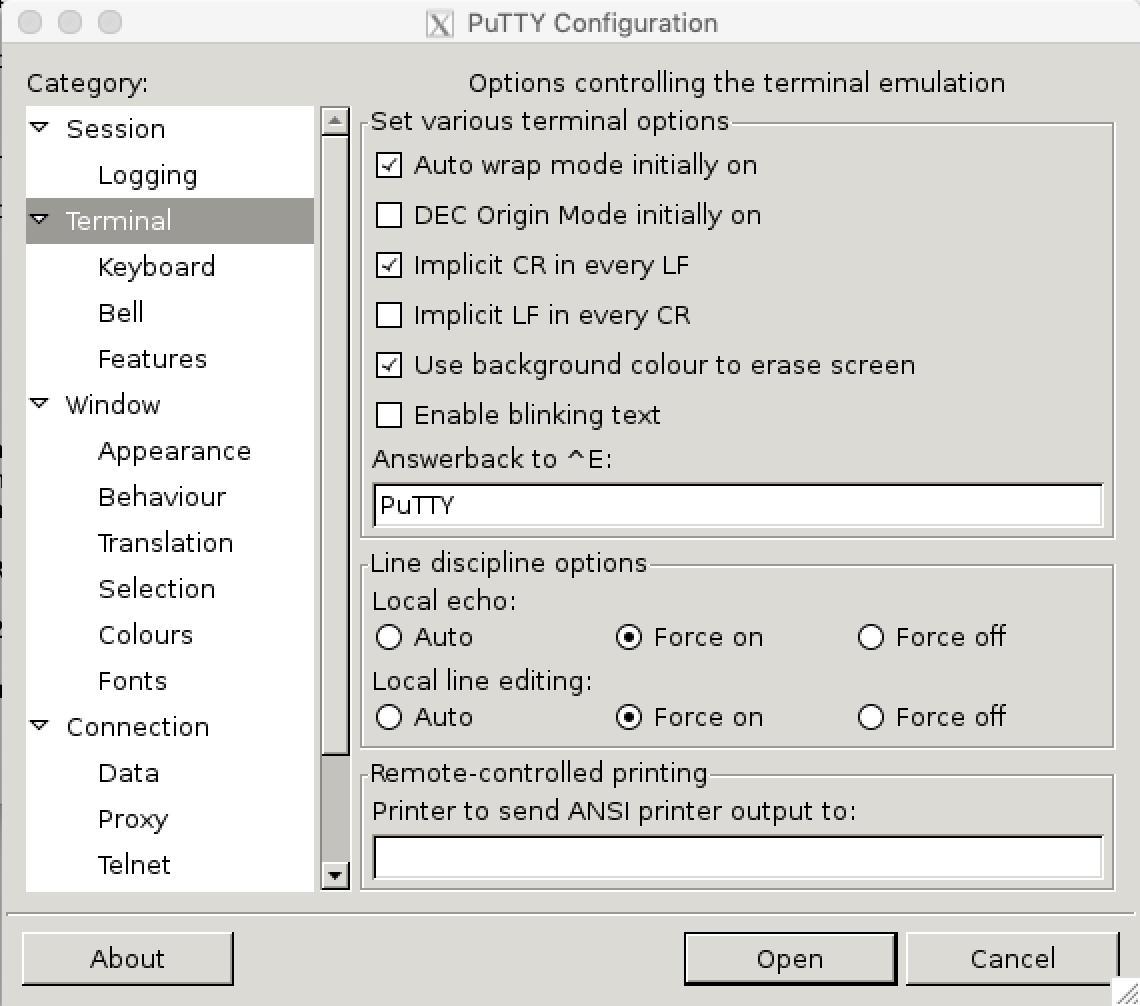
Use a serial terminal application to connect to the board (for Linux we use tio, on Windows, putty is a good choice, for MacOS we use either Serial or minicom). Since the connection is USB/RS232 pretty much any baud rate is supported. The other relevant serial line parameters are: 8 bits, 1 stop bit, no parity, no flow control. The terminal mode should be line buffered with standalone linefeed characters interpreted as carriage return/linefeed combinations.
Typing the V command should return firmware version information.
Something similar to the following:
V
ECApp USB command processor (Pico v0.9).
Copyright, Dyadic Pty Ltd (2022).
.
Entering nothing at all should return the following:
No cmd.
Pinout
Raspberry Pi Pico board pinout
Debugging
Debug with picoprobe and openocd
-
Build picoprobe. Note that this requires that the PiPico SDK is already installed.
git clone --recurse-submodules https://github.com/raspberrypi/picoprobe.git
cd picoprobe
mkdir build
cd build
cmake
make
The resulting
picoprobe.uf2is then copied to the pipico. -
Build openocd. Note that on MacOS this will require installing some prerequisities using either homebrew or macports. For example, using homebrew:
-
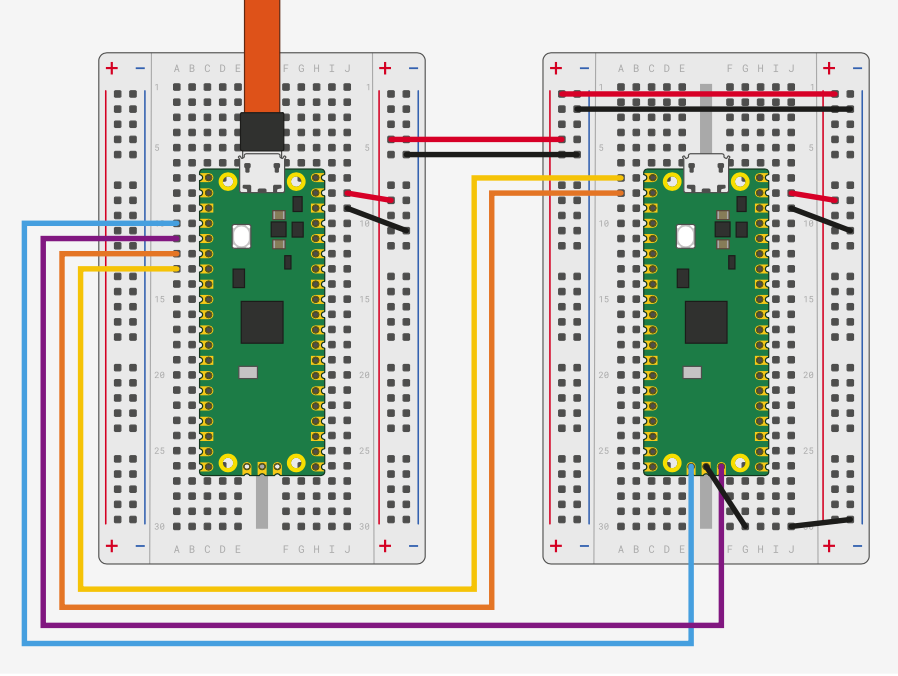
Start openocd. Note that the picoprobe hardware should be wired to the target board as shown. Wiring between Pico A (left) and Pico B (right) configuring Pico A as a debugger. Note that if Pico B is a USB Host then you’d want to hook
VBUSup toVBUSso it can provide 5V instead ofVSYStoVSYS.
Picoprobe wiring
Open On-Chip Debugger 0.11.0-g4f2ae61-dirty (2023-06-30-19:24)
Licensed under GNU GPL v2
For bug reports, read
        http://openocd.org/doc/doxygen/bugs.html
Info : auto-selecting first available session transport "swd". To override use 'transport select <transport>'.
Info : Hardware thread awareness created
Info : Hardware thread awareness created
Info : RP2040 Flash Bank Command
adapter speed: 5000 kHz

Info : Listening on port 6666 for tcl connections
Info : Listening on port 4444 for telnet connections
Info : Using CMSIS-DAPv2 interface with VID:PID=0x2e8a:0x000c, serial=E660583883389832
Info : CMSIS-DAP: SWD  Supported
Info : CMSIS-DAP: FW Version = 2.0.0
Info : CMSIS-DAP: Interface Initialised (SWD)
Info : SWCLK/TCK = 0 SWDIO/TMS = 0 TDI = 0 TDO = 0 nTRST = 0 nRESET = 0
Info : CMSIS-DAP: Interface ready
Info : clock speed 5000 kHz
Info : SWD DPIDR 0x0bc12477
Info : SWD DLPIDR 0x00000001
Info : SWD DPIDR 0x0bc12477
Info : SWD DLPIDR 0x10000001
Info : rp2040.core0: hardware has 4 breakpoints, 2 watchpoints
Info : rp2040.core1: hardware has 4 breakpoints, 2 watchpoints
Info : starting gdb server for rp2040.core0 on 3333
Info : Listening on port 3333 for gdb connections
In another terminal session:
GNU gdb (Zephyr SDK 0.16.1) 12.1
Copyright (C) 2022 Free Software Foundation, Inc.
License GPLv3+: GNU GPL version 3 or later <http://gnu.org/licenses/gpl.html>
This is free software: you are free to change and redistribute it.
There is NO WARRANTY, to the extent permitted by law.
Type "show copying" and "show warranty" for details.
This GDB was configured as "--host=x86_64-host_apple-darwin --target=arm-zephyr-eabi".
Type "show configuration" for configuration details.
For bug reporting instructions, please see:
<https://github.com/zephyrproject-rtos/sdk-ng/issues>.
Find the GDB manual and other documentation resources online at:
    <http://www.gnu.org/software/gdb/documentation/>.

For help, type "help".
Type "apropos word" to search for commands related to "word".
Reading symbols from zephyr.elf...
(gdb)
(gdb) target extended-remote localhost:3333
Remote debugging using localhost:3333
warning: multi-threaded target stopped without sending a thread-id, using first non-exited thread
arch_cpu_idle ()
    at /Users/timm/Documents/Electronics/Designs/ProdGitRepos/software/zephyrproject/zephyr/arch/arm/core/aarch32/cpu_idle.S:127
127               isb
(gdb)
In emacs, gdb mode should be customized with the path to the ARM/Zephyr
gdb version. If the Zephyr SDK is installed under .local this will be
~/.local/zephyr-sdk-0.16.1/arm-zephyr-eabi/bin/arm-zephyr-eabi-gdb.
This needs to be done only once.
Start GDB mode using M-x gdb. In the gud command window connect to the
running openocd process and load the target file. Now set a breakpoint in
main and run the embedded target:
target extended-remote localhost:3333

Remote debugging using localhost:3333
warning: No executable has been specified and target does not support
determining executable automatically.  Try using the "file" command.warning: multi-threaded target stopped without sending a thread-id, using first non-exited thread
0x10000c10 in ?? ()

(gdb) file zephyr.elf
Reading symbols from zephyr.elf...

(gdb) b main
Breakpoint 1 at 0x10000448: file /Users/timm/Documents/Electronics/Designs/ProdGitRepos/software/zephyrproject/zephyr/build/zephyr/include/generated/syscalls/device.h, line 55.
Note: automatically using hardware breakpoints for read-only addresses.

(gdb) r
Starting program: /Users/timm/Documents/Electronics/Designs/ProdGitRepos/software/zephyrproject/zephyr/build/zephyr/zephyr.elf
[New Thread 1]
[Switching to Thread 1]
...
Putty Serial Configuration

Figure 3a: PuTTY serial line configuration

Figure 3b: PuTTY terminal configuration