An Atmega32U2 Controller
Features
Light weight design with minimal components.
Serial control via USB/RS232 from host computer.
SPI control of devices in addition to 16 general IO lines.
Usage
Quick start
This section assumes that the ECApp firmware has been successfully loaded onto the Atmega32U2 board. (See Building the firmware for details on building and loading the bootloader and firmware.)
Connect to the Atmega32U2 board. On Linux, dmesg should display
something like the following to indicate that a new serial device
(/dev/ttyACM0 in this case) is available for use:
[ 1031.362844] usb 1-1.2: new full-speed USB device number 5 using dwc\_otg
[ 1031.466486] usb 1-1.2: New USB device found, idVendor=03eb, idProduct=2044
[ 1031.466516] usb 1-1.2: New USB device strings: Mfr=1, Product=2, SerialNumber=220
[ 1031.466532] usb 1-1.2: Product: LUFA CDC Demo
[ 1031.466546] usb 1-1.2: Manufacturer: Dean Camera
[ 1031.466558] usb 1-1.2: SerialNumber: 7403431323935180A1A1
[ 1031.533209] cdc\_acm 1-1.2:1.0: ttyACM0: USB ACM device
[ 1031.536508] usbcore: registered new interface driver cdc\_acm
[ 1031.536538] cdc\_acm: USB Abstract Control Model driver for USB modems and ISDN adapters
On MacOS running ioreg should show the following:
$ ioreg -p IOUSB
+-o Root  <class IORegistryEntry, id 0x100000100, retain 15>
  +-o AppleUSBXHCI Root Hub Simulation@14000000  <class AppleUSBRootHubDevice, id 0x1000002f8, registered, matched, active, busy 0 $
    +-o BRCM20702 Hub@14300000  <class AppleUSBDevice, id 0x10000031a, registered, matched, active, busy 0 (235 ms), retain 12>
    | +-o Bluetooth USB Host Controller@14330000  <class AppleUSBDevice, id 0x10000032b, registered, matched, active, busy 0 (5706 $
    +-o Apple Internal Keyboard / Trackpad@14400000  <class AppleUSBDevice, id 0x10000034c, registered, matched, active, busy 0 (73$
    +-o LUFA CDC Demo@14200000  <class AppleUSBDevice, id 0x10001f0b5, registered, matched, active, busy 0 (48 ms), retain 13>
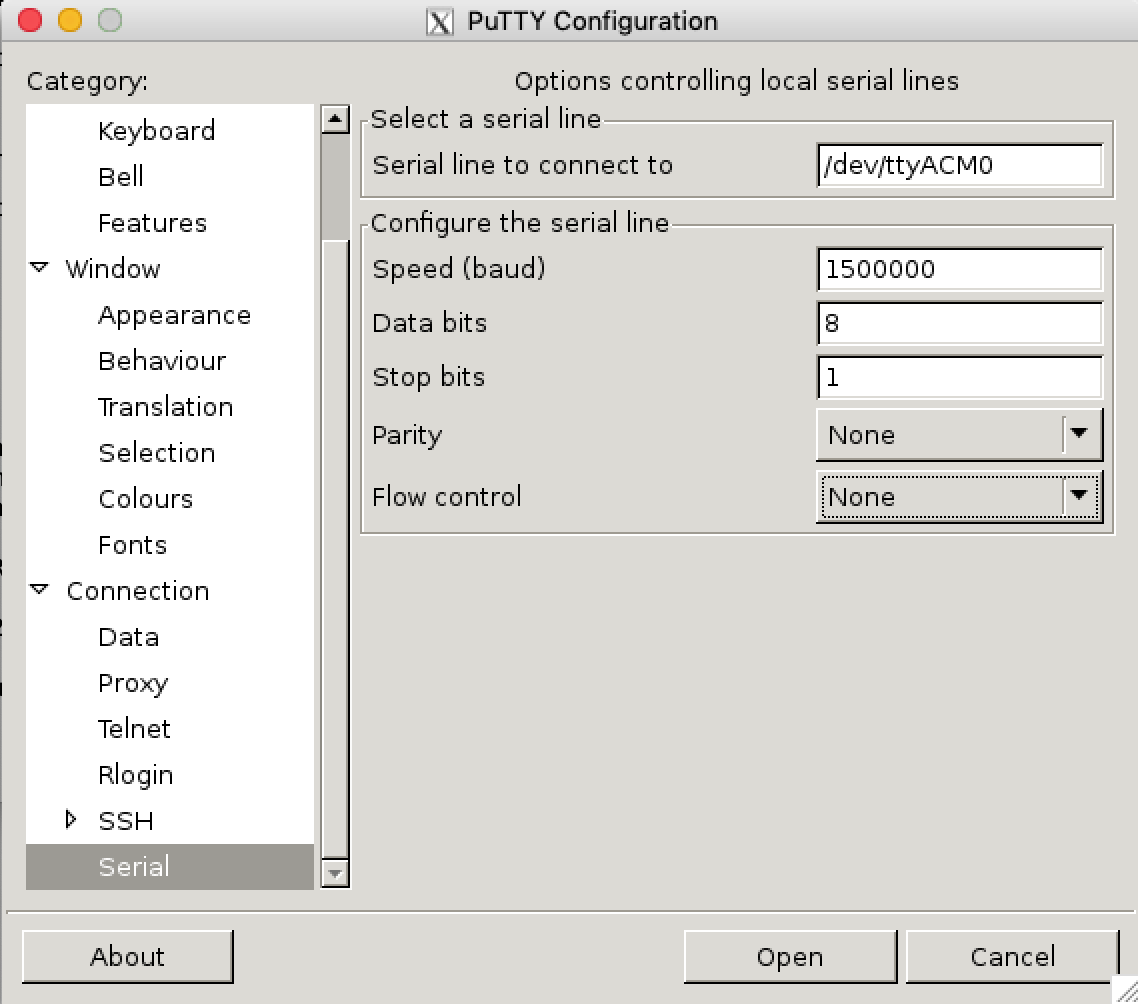
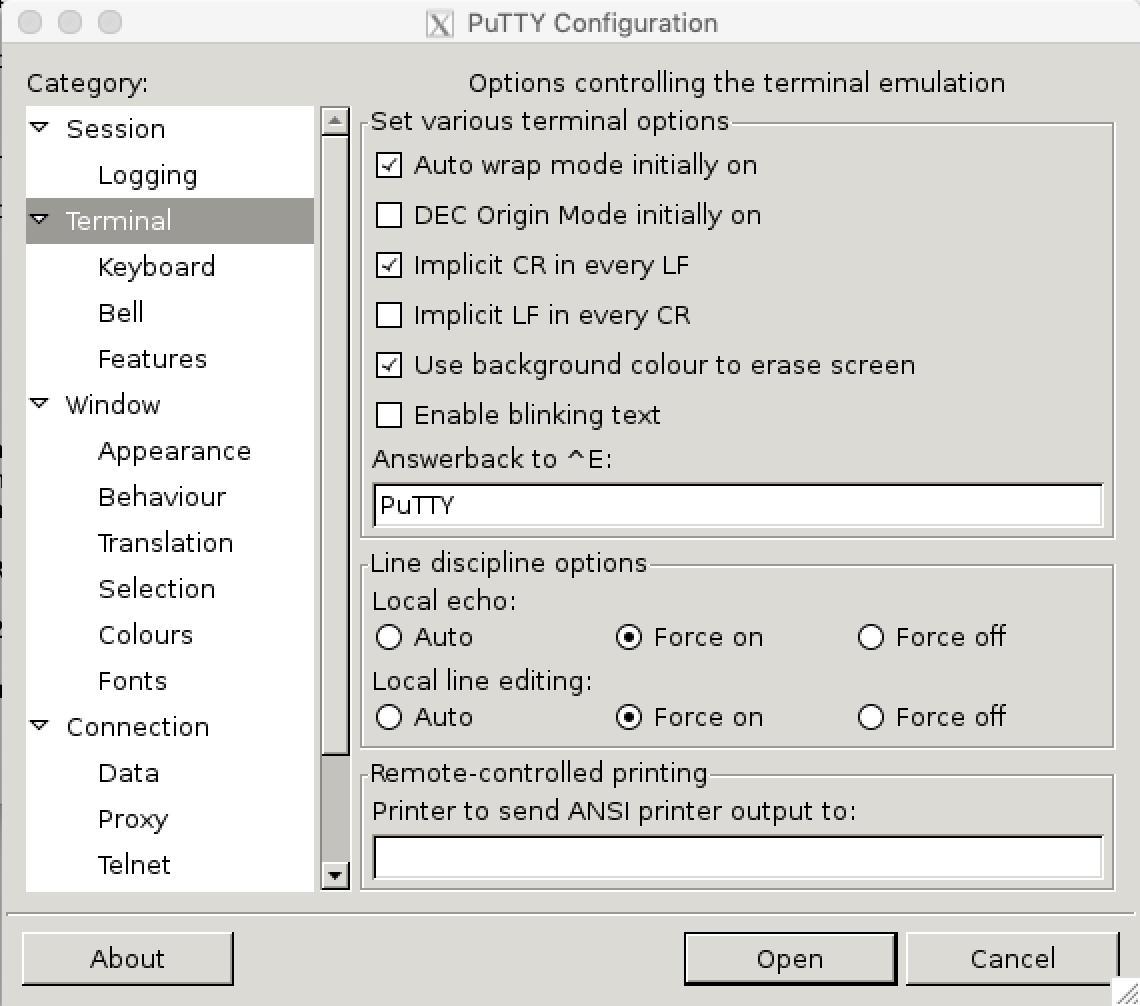
Use a serial terminal application to connect to the board (for Linux or Windows, putty is a good choice, for MacOS we use either Serial or minicom). Since the connection is USB/RS232 pretty much any baud rate is supported. The other relevant serial line parameters are: 8 bits, 1 stop bit, no parity, no flow control. The terminal mode should be line buffered with standalone linefeed characters interpreted as carriage return/linefeed combinations.
Typing the V command should return firmware version information.
Something similar to the following:
V
ECApp USB command processor (v0.95).
Copyright, Dyadic Pty Ltd (2022).
.
Entering nothing at all should return the following:
No cmd.
Pinout
Figure 2: Pinout of the Atmega32u2 board.
Bootloader
The standard LUFA DFU bootloader is loaded onto the board. The bootloader is
activated by briefly grounding the RESET pin on the board. The bootloader code then
takes control and the board enumerates to the host as a DFU Class device. (Note that
if the microcontroller board is wired in-circuit then the Vcc line should be
disconnected. The board will be powered from the USB connection in this case.) On
MacOS listing the USB devices will show something similar to the following (note the
last entry):
$ ioreg -p IOUSB
+-o Root  <class IORegistryEntry, id 0x100000100, retain 15>
  +-o AppleUSBXHCI Root Hub Simulation@14000000  <class AppleUSBRootHubDevice, id 0x1000002f8, registered, matched, active, busy 0 $
    +-o BRCM20702 Hub@14300000  <class AppleUSBDevice, id 0x10000031a, registered, matched, active, busy 0 (215 ms), retain 12>
    | +-o Bluetooth USB Host Controller@14330000  <class AppleUSBDevice, id 0x10000032b, registered, matched, active, busy 0 (5685 $
    +-o Apple Internal Keyboard / Trackpad@14400000  <class AppleUSBDevice, id 0x10000034c, registered, matched, active, busy 0 (52$
    +-o LUFA DFU@14200000  <class AppleUSBDevice, id 0x10001f035, registered, matched, active, busy 0 (23 ms), retain 11>
Application code is the flashed using dfu-programmer as follows:
Output from the above should be similar to the following:
0%                            100%  Programming 0x1980 bytes...
[>>>>>>>>>>>>>>>>>>>>>>>>>>>>>>>>]  Success
0%                            100%  Reading 0x7000 bytes...
[>>>>>>>>>>>>>>>>>>>>>>>>>>>>>>>>]  Success
Validating...  Success
0x1980 bytes written into 0x7000 bytes memory (22.77%).
Note that the --force option will be required if the controller already
has application code loaded:
Alternatively, a separate erase operation can be performed before (re)flashing
the controller:
$ dfu-programmer atmega32u2 erase cmdproc.hex
Checking memory from 0x0 to 0x6FFF...  Not blank at 0x1.
Erasing flash...  Success
$ dfu-programmer atmega32u2 flash cmdproc.hex
Checking memory from 0x0 to 0x197F...  Empty.
0%                            100%  Programming 0x1980 bytes...
[>>>>>>>>>>>>>>>>>>>>>>>>>>>>>>>>]  Success
0%                            100%  Reading 0x7000 bytes...
[>>>>>>>>>>>>>>>>>>>>>>>>>>>>>>>>]  Success
Validating...  Success
0x1980 bytes written into 0x7000 bytes memory (22.77%).
After successfully flashing the application code the board should be reset.
The application will now run and enumerate to the host as a CDC Class device. This
can be verified on MacOS by running ioreg:
$ ioreg -p IOUSB
+-o Root  <class IORegistryEntry, id 0x100000100, retain 15>
  +-o AppleUSBXHCI Root Hub Simulation@14000000  <class AppleUSBRootHubDevice, id 0x1000002f8, registered, matched, active, busy 0 $
    +-o BRCM20702 Hub@14300000  <class AppleUSBDevice, id 0x10000031a, registered, matched, active, busy 0 (235 ms), retain 12>
    | +-o Bluetooth USB Host Controller@14330000  <class AppleUSBDevice, id 0x10000032b, registered, matched, active, busy 0 (5706 $
    +-o Apple Internal Keyboard / Trackpad@14400000  <class AppleUSBDevice, id 0x10000034c, registered, matched, active, busy 0 (73$
    +-o LUFA CDC Demo@14200000  <class AppleUSBDevice, id 0x10001f0b5, registered, matched, active, busy 0 (48 ms), retain 13>
Installing dfu-programmer
dfu-programmer is installed by doing the following:
git clone https://github.com/dfu-programmer/dfu-programmer.git
cd dfu-programmer
./bootstrap.sh
./configure
make
sudo make install
Note that autoconf and automake will need to be installed to allow the
bootstrap to run.
Putty Serial Configuration

Figure 3a: PuTTY serial line configuration

Figure 3b: PuTTY terminal configuration