
Using Linux Containers for Red Pitaya Dvelopment
Installing Incus
At the time of writing this a native incus package is currently available in the
Debian testing and unstable repositories. This package will be featured in the
upcoming Debian 13 (trixie) release. provides up to date and supported Incus packages
for Debian stable releases (11 and 12). Those packages contain everything needed to
use all Incus features.
Add the Zabbly stable repository:
$ curl -fsSL https://pkgs.zabbly.com/key.asc | gpg --show-keys --fingerprint
$ mkdir -p /etc/apt/keyrings/
$ sudo curl -fsSL https://pkgs.zabbly.com/key.asc -o /etc/apt/keyrings/zabbly.asc
$ sudo sh -c 'cat <<EOF > /etc/apt/sources.list.d/zabbly-incus-stable.sources
Enabled: yes
Types: deb
URIs: https://pkgs.zabbly.com/incus/stable
Suites: $(. /etc/os-release && echo ${VERSION_CODENAME})
Components: main
Architectures: $(dpkg --print-architecture)
Signed-By: /etc/apt/keyrings/zabbly.asc

EOF'
Install the incus package:
(Up to date install instructions can be found at https://github.com/zabbly/incus.)
Initialize Incus
$ sudo adduser timm incus-admin
$ newgrp incus-admin
$ incus admin init
Would you like to use clustering? (yes/no) [default=no]:
Do you want to configure a new storage pool? (yes/no) [default=yes]:
Name of the new storage pool [default=default]:
Name of the storage backend to use (dir, lvm, lvmcluster, btrfs) [default=btrfs]:
Would you like to create a new btrfs subvolume under /var/lib/incus? (yes/no) [default=yes]:
Would you like to create a new local network bridge? (yes/no) [default=yes]:
What should the new bridge be called? [default=incusbr0]:
What IPv4 address should be used? (CIDR subnet notation, “auto” or “none”) [default=auto]:
What IPv6 address should be used? (CIDR subnet notation, “auto” or “none”) [default=auto]:
Would you like the server to be available over the network? (yes/no) [default=no]: yes
Address to bind to (not including port) [default=all]:
Port to bind to [default=8443]:
Would you like stale cached images to be updated automatically? (yes/no) [default=yes]:
Would you like a YAML "init" preseed to be printed? (yes/no) [default=no]:
Launch a Container Instance
How to create instances with incus provides details on creating containers and VMs
using incus.
or:
Note that images is the default (remote) image server. Available image servers are
listed using:
To reference an image, specify its remote and its alias or fingerprint, separated with a colon. For example:
images:ubuntu/22.04
images:ubuntu/22.04
local:ed7509d7e83f
To list all images on a server, enter the following command:
To filter the results that are displayed, specify a part of the alias or fingerprint after the command. For example, to show all Ubuntu 22.04 images, enter the following command:
Several filters can be specified as well. For example, to show all AMD 64-bit Debian 12 images, enter the following command:
To filter for properties other than alias or fingerprint, specify the filter in
<key>=<value> format. For example:
More documentation on managing images.
incus list
+--------+---------+----------------------+-----------------------------------------------+-----------+-----------+
|  NAME  |  STATE  |         IPV4         |                     IPV6                      |   TYPE    | SNAPSHOTS |
+--------+---------+----------------------+-----------------------------------------------+-----------+-----------+
| xilinx | RUNNING | 10.90.142.198 (eth0) | fd42:c24a:a174:9e22:216:3eff:fecc:2d3d (eth0) | CONTAINER | 0         |
+--------+---------+----------------------+-----------------------------------------------+-----------+-----------+
Get a shell prompt on the container:
incus exec xilinx -- /bin/bash
root@xilinx:~# ls /
bin  boot  dev  etc  home  lib  lib64  media  mnt  opt  proc  root  run  sbin  srv  sys  tmp  usr  var
root@xilinx:~#
Alternatively (although this appears to be undocumented):
Launch a VM
For the Vivado/Vitus development tools a container isn't an option because of the
requirement for the possible access to USB devices. Note that with the standard Incus
container there will be no USB bus under /dev and the Vivado/Vitus tools will fail
when probing for USB device functionality.
On the host:
incus launch images:debian/12 xilinx --vm -c limits.cpu=2 -c limits.memory=16GiB --device root,size=400GiB
incus shell xilinx
In the vm:
apt-get update
apt-get --yes --no-install-recommends install   openssh-server linux-headers-amd64 autofs samba psmisc screen vim xauth   bc binfmt-support bison build-essential ca-certificates curl   debootstrap device-tree-compiler dosfstools flex fontconfig git   libgtk-3-0 libncurses-dev libssl-dev libtinfo5 parted qemu-user-static   squashfs-tools sudo u-boot-tools x11-utils xvfb zerofree zip
parted /dev/sda
resize2fs /dev/sda2 398G
In parted:
# parted /dev/sda
GNU Parted 3.5
Using /dev/sda
Welcome to GNU Parted! Type 'help' to view a list of commands.
(parted) print
Model: QEMU QEMU HARDDISK (scsi)
Disk /dev/sda: 429GB
Sector size (logical/physical): 512B/512B
Partition Table: gpt
Disk Flags:

Number  Start   End     Size    File system  Name  Flags
 1      1049kB  106MB   105MB   fat32              boot, esp
 2      106MB   4295MB  4189MB  ext4

(parted) resizepart 2 429GB
Warning: Partition /dev/sda2 is being used. Are you sure you want to continue?
Yes/No? Yes
(parted) quit
Information: You may need to update /etc/fstab.
Add a user:
root@xilinx:~# adduser dyadic
Adding user `dyadic' ...
Adding new group `dyadic' (1000) ...
Adding new user `dyadic' (1000) with group `dyadic (1000)' ...
Creating home directory `/home/dyadic' ...
Copying files from `/etc/skel' ...
New password:
Retype new password:
passwd: password updated successfully
Changing the user information for dyadic
Enter the new value, or press ENTER for the default
        Full Name []: Dyadic
        Room Number []:
        Work Phone []:
        Home Phone []:
        Other []:
Is the information correct? [Y/n]
Adding new user `dyadic' to supplemental / extra groups `users' ...
Adding user `dyadic' to group `users' ...
Set up SSH trusts if required.
Installing the Xilinx Vitis Core Development Kit
Download “AMD Unified Installer for FPGAs & Adaptive SoCs 2023.1 SFD” from the Xilinx download page (the file name is Xilinx_Unified_2023.1_0507_1903.tar.gz)
-
Create the
/opt/Xilinxdirectory, unpack the installer and run it.root@xilinx:~# mkdir /opt/Xilinx root@xilinx:~# chown -R dyadic /opt/Xilinx root@xilinx:~# chgrp -R dyadic /opt/Xilinx ... dyadic@xilinx:~$ cd /opt/Xilinx dyadic@xilinx:~$ (ssh dirac "cd ~/Downloads; gzip -dc Xilinx_Unified_2023.1_0507_1903.tar.gz") | tar xvf - dyadic@xilinx:~$ cd Xilinx_Unified_2023.1_0507_1903/
-
Ensure the right packages are installed:
sudo apt-get --no-install-recommends install python3 bc binfmt-support bison build-essential ca-certificates curl debootstrap device-tree-compiler dosfstools flex fontconfig git libgtk-3-0 libncurses-dev libssl-dev libtinfo5 parted qemu-user-static squashfs-tools sudo u-boot-tools x11-utils xvfb zerofree zip
-
The installation is run in batch mode. This entails executing a couple of commands before running the install. The following command creates an authentication token and will prompt for a Xilinx account user name (e-mail address) and password:
The next command will create a configuration file to guide the installation and will prompt for the product to install - this should be
Vitis:Take note of where the configuration file is created:
INFO - Config file available at /home/dyadic/.Xilinx/install_config.txt. Please use -c <filename> to point to this install configuration.
Finally, run the install:
export LD_LIBRARY_PATH=/lib/x86_64-linux-gnu:/opt/Xilinx/Vivado/2023.1/lib/lnx64.o:/opt/Xilinx/Vitis/2023.1/lib/lnx64.o
./xsetup --batch Install --agree XilinxEULA,3rdPartyEULA --location /opt/Xilinx --config /home/dyadic/.Xilinx/install_config.txt
Note that (at least for Debian Bullseye) the
LD_LIBRARY_PATHneeds to be explicitly set otherwise the installer will hang towards the end of the installation process. Also note that the--locationshould be set to the location of the generated configuration file as reported by the previousConfigGencommand. -
After installation insert the following at the end of ~/.bashrc:
-
Configure SSH to allow X11 forwarding. First, in
~dyadic/.ssh/configinclude the following:Host <vm-host> ForwardX11Trusted yes ForwardX11 yesAnd in the
/etc/ssh/sshd_configinclude the following line:AddressFamily inet
The reload the SSHD config:
-
To remove the installation run the following:
Test the Xilinx Vivado Installation
Clone Pavel Demin's red-pitaya-notes repo:
Build the default project (the led_blinker using the xc7z010clg400-1):
Attach/Remove a USB Device
On the VM, make sure that usbutils is installed:
On the VM host:
$ lsusb
...
Bus 001 Device 015: ID 05e3:0723 Genesys Logic, Inc. GL827L SD/MMC/MS Flash Card Reader
..
Now on the VM:
$ incus config device add xilinx sdcard usb vendorid=05e3 productid=0723
Device sdcard added to xilinx
The device can be removed from the VM using:
Configure Digilent JTAG SMT2
Ensure that the JTAG SMT2 is connected to the host via USB cable and powered on (using a separate 3.3V supply). The JTAG SMT2 will appear as the following device on the host machine:
$ lsusb
...
Bus 001 Device 016: ID 0403:6014 Future Technology Devices International, Ltd FT232H Single HS USB-UART/FIFO IC
...
Install the Digilent Adept software from https://lp.digilent.com/complete-adept-runtime-download
The Adept package will install (among other things) a device rule for the Digilent
JTAG SMT2 USB device. When that USB device is added, the rule will run
/usr/sbin/dftdrvdtch in order to make the device visible to the Vivado tools.
The following command is run on the host machine to add the JTAG SMT2 device to the VM:
If required, t he device can be removed from the VM at a later time using:
Initially , in vivado, select Open Hardware Manager then click on Open target
and select Open New Target... to activate the Open Hardware Target
dialogue. Select Next leave the Connect to selection as Local server and click
Next again. This should display something like the following:
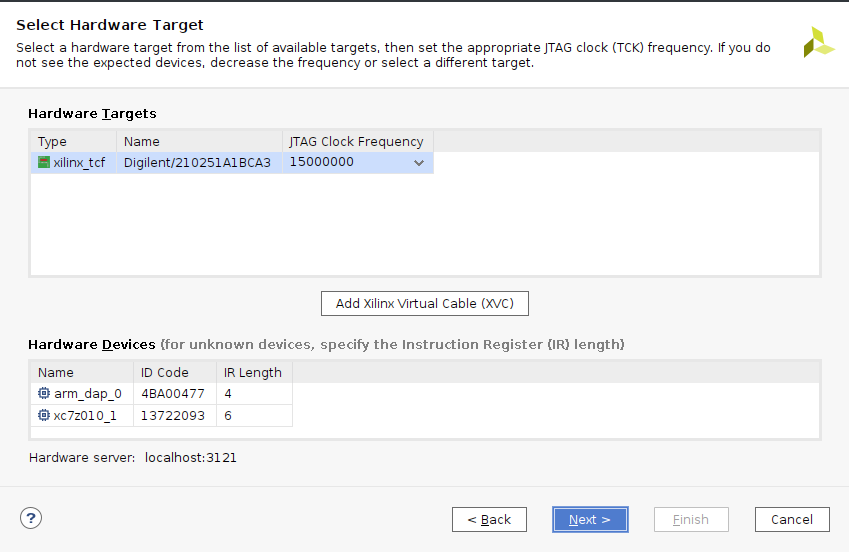
Select hardware target
Click Next again, and finally Finish.
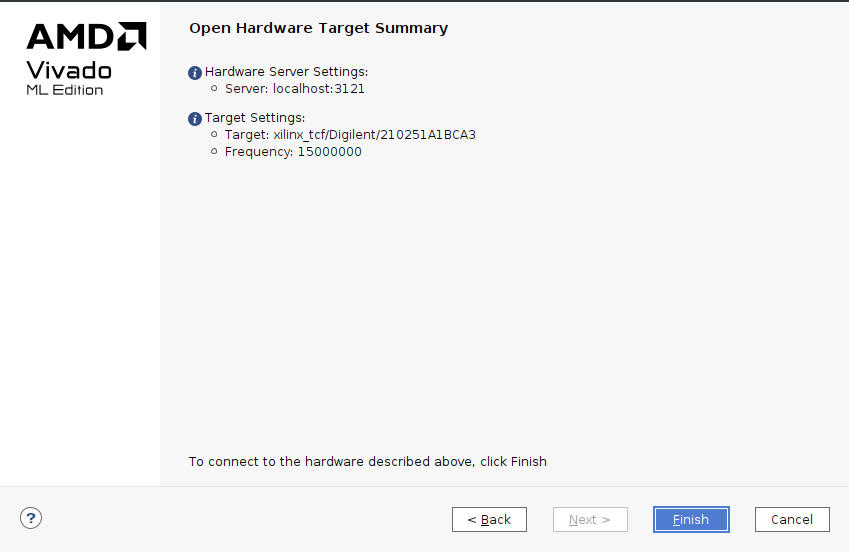
Hardware target summary
On starting vivado subsequently, select Open Hardware Manager then click on Open target and select Recent Targets and then select the xilinx_tcf/Digilent item.